
Pallet Grill Prep Table: How to Build a BBQ Island From Two Pallets

Picture a mild evening on the patio. The grill is hot, the string lights are on, and for once you're not juggling plates on the grill's tiny side shelf.
The platter, the herb pot and a basket of peppers sit on a green island right beside you. The pan and towels wait on the shelf below. Your neighbor leans over the fence and asks, "Where did you get that?"
This guide contains Amazon affiliate links. As an Amazon Associate I earn from qualifying purchases, at no extra cost to you.
You built it yourself, from two pallets and a few 2x6s. That's the pallet grill prep table from our video, a small BBQ island for the patio. Two pallets, cut down and painted sage green, make the sides. Two shelves sit between them, and a top of seven 2x6s gives you a solid counter at the standard 36-inch height. You can build it in a weekend, plus drying time. With free pallets, it costs about $135 to $170.
When a pallet BBQ island video goes around, the comments ask the same things. How heavy is it? What keeps screws from sticking up through the top? Shouldn't it have wheels? Every answer is below, with 7 steps and a picture for each, plus the five mistakes that make a pallet grill table fail.
At a glance
- Time: a weekend of work, plus a day or two for the paint and stain to dry
- Skill: intermediate. You cut with a circular saw and drive screws with a drill.
- Cost: about $135 to $170 with free pallets, not counting tools
- Best time to build: now, while it's still warm enough to paint outside. Most latex paint wants 50°F or warmer. Built this month, it stands beside the grill for Thanksgiving, long before the first spring cookout.
Jump to a section
- How the Grill Prep Table Goes Together
- What You Need, and What It Costs
- Step 1: Check the Stamps and Cut the Two Sides
- Step 2: Sand, Paint and Stain Before You Build
- Step 3: Stand the Sides and Add the Rails
- Step 4: Screw the Cleats Inside the Sides
- Step 5: Lay the Shelves and Screw Them Down
- Step 6: Lay the Top and Screw It On
- Step 7: Set It Beside the Grill, Not Against It
- The Mistakes That Make It Fail
- Keep It Ready for the Grill: Rain, Grease and Stain
- FAQ
If you buy one thing
Start with leveling feet
Patios slope so rain runs off, and pavers are never quite even. Screw-on leveling feet take the rock out of the table in a minute, and they keep the pallet wood off the wet ground.
How the Grill Prep Table Goes Together

Two pallets, cut down and stood on edge, make the sides. Rails tie them together, two shelves sit between them, and a 2×6 top screws onto the rails.
- Each side is a pallet cut to 33 1/2 inches tall and about 21 inches deep. Its thick runners stand up and down like legs, and the boards run front to back.
- A 2×4 rail runs across the front and the back at the top. Inside, 2×4 cleats carry two shelves of pallet boards.
- Seven 2x6s, 26 inches long, make a top 40 inches wide. The feet, the sides and the top add up to 36 inches, a standard counter height.
The sides in the video show only a few boards on a frame. Keeping every board on the outside face makes a stiffer side, one that doesn't lean when you press down on the top.
What You Need, and What It Costs

- Three wood pallets, 48 x 40 inches, stamped HT: two for the sides and one for the shelf boards.
- Three 2x6s, 8 feet long, for the top.
- Two 2x4s, 8 feet long, for the rails and cleats.
- Leveling feet, a set of four with screw-on plates, about 1 inch tall.
- Exterior primer, 1 quart, for the sides.
- Exterior paint in sage green, 1 quart.
- Exterior wood stain and sealer in one, 1 quart, for the top and shelves.
- Exterior wood screws in 1 5/8, 2 1/2 and 3 inches.
- Orbital sander with 80- and 120-grit discs.
- Tools: circular saw, drill, pry bar, hammer, tape measure, square, level and brushes. Wear safety glasses, gloves and ear protection.
What it costs: about $135 to $170 in all, with free pallets and not counting tools. That's with prices we found at US stores on October 15, 2026. The 2x6s and 2x4s are about $28 to $36. The primer, paint and stain are about $55 to $70, and the feet, screws and sandpaper about $50 to $65.
Two buying tips:
- Ask for pallets at garden centers, hardware stores and feed stores. Pick two for the sides that match in size, check the stamp on each one and leave blue ones behind.
- Pick straight 2x6s at the store. Look down the length of each board, and skip any that twist or bow. The top is only as flat as its boards.
Step 1: Check the Stamps and Cut the Two Sides

- Find the stamp on each pallet, and use only pallets marked HT (heat treated).
- Mark a line across the three runners, 33 1/2 inches from one end, in a gap between boards.
- Cut along it with a circular saw, then flip the pallet and cut from the other face.
- Cut along the boards just past the middle runner, on both faces, and keep the piece with two runners. Cut the second pallet the same way.
Watch out: skip pallets stamped MB, a pesticide treatment, and pallets with no stamp. University of Maryland Extension gives the same advice for garden pallets. If your feet stand taller or shorter than 1 inch, change the 33 1/2-inch cut by the same amount.
Step 2: Sand, Paint and Stain Before You Build

- Pry the boards off the inside face of each side and off the third pallet, and pull every nail.
- Sand everything with 80-grit discs, then 120-grit, until a rag slides over it without catching.
- Prime the sides, then paint them sage green in two coats, letting each one dry as the can directs.
- Stain the 2x6s and the shelf boards on every face, as the can directs.
Watch out: the bottom ends of the sides soak up water like a straw. Give them an extra coat of paint, so they last on a wet patio.
Step 3: Stand the Sides and Add the Rails
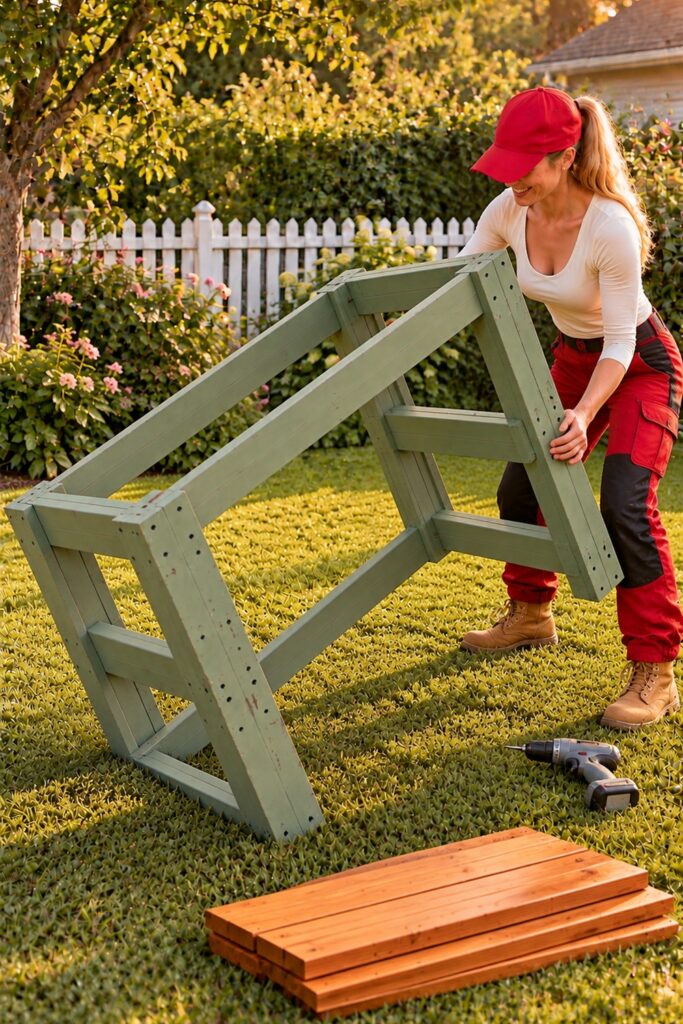
- Screw a leveling foot under each runner, at the bottom of each side.
- Stand the sides up, boards facing out, with their outside faces 36 inches apart.
- Screw a 36-inch 2×4 rail across the two front runners at the top, flush, with two 2 1/2-inch screws into each runner. Add one across the back the same way.
Watch out: use 2 1/2-inch screws here. A runner is only 1 1/2 inches thick front to back, so a 3-inch screw comes out the other side.
Step 4: Screw the Cleats Inside the Sides

- Cut four 2×4 cleats, 21 inches long.
- Screw one across the inside of each side, narrow edge up, with its top 6 inches above the bottom of the side. Use two 3-inch screws into each runner.
- Add a second pair with their tops 19 inches up.
- Check each pair with a level, across the table and front to back.
Watch out: drive every screw into a runner. A screw that only bites a thin board holds almost nothing once the shelf is loaded.
Step 5: Lay the Shelves and Screw Them Down
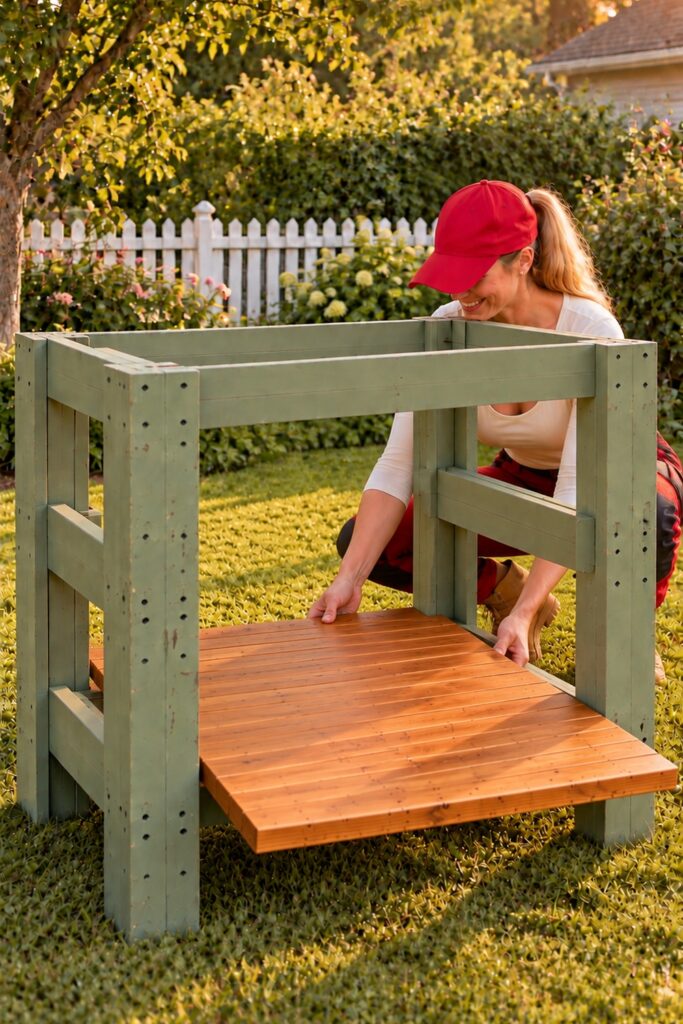
- Measure between the sides, about 27 3/4 inches, and cut the shelf boards to fit.
- Lay five or six boards across each pair of cleats, side by side.
- Screw each board down at both ends with one 1 5/8-inch screw.
Watch out: leave a gap of about 1/4 inch between shelf boards, so rain and spills drain through.
Step 6: Lay the Top and Screw It On

- Cut the three 2x6s into seven pieces, 26 inches long.
- Lay them across the rails, front to back, with a 1/4-inch gap between boards and 2 inches over each side.
- Drill a pilot hole and drive two 3-inch screws through each end of each board into the rail.
- Sink every screw head a little below the surface.
Watch out: run a hand over the top when you're done. A screw head that stands up catches towels and scratches platters.
Step 7: Set It Beside the Grill, Not Against It

- Set the table at least 2 feet from the grill's sides and back, or farther if your grill's manual asks.
- Turn the feet until the table stands level and doesn't rock.
- Never set the grill, a hot grate or a hot pan right on the wood.
Watch out: this table is wood, and many gas grill manuals ask for 24 inches between the grill and anything that can burn. The National Fire Protection Association lists a grill set too close to something that can burn as a leading cause of grill fires.
Then carry out the platter, set the herb pot on top and slide the pan onto the bottom shelf. The grill's tiny side shelf can finally go back to holding the tongs.
The Mistakes That Make It Fail

These five come up again and again under pallet BBQ island videos, and each one has a simple fix:
- Screw heads standing up on the top. They catch towels and scratch platters. Sink every head below the surface.
- Carrying it like it's light. It's heavy. Build it near its spot, and walk it on two legs with a helper.
- Two pallets that don't match. The table comes out crooked. Pick two standard 48 x 40 pallets with the same runners.
- No wheels when it has to move. If it goes into the garage for winter, use locking casters instead of feet. Our pallet kitchen island shows how.
- Bare wood left in the rain. Pallet pine soaks up water and rots. Paint and stain every face, and keep it under the patio roof or a cover.
Get those five right for the table in the picture: sage green sides, honey shelves and room for everything.
Keep It Ready for the Grill: Rain, Grease and Stain

- Rain: keep it under the patio roof, or cover it when a storm comes through.
- Grease: wipe spills off the top the same day with warm, soapy water.
- Stain: when water stops beading on the top, sand it lightly and add a fresh coat.
- Wobble: each spring, tighten the rail and top screws and check the feet.
Then light the grill, set out the platter and wait for the first neighbor who asks where you got it. For seats around the grill, see our cinder block bench.
Watch this build, and the next ones, on YouTube, Facebook and Instagram.
Start here
Want the platter, the herbs and the pan right beside the grill? Start with the feet: a table that doesn't rock is the one you'll use.
FAQ
How Tall Should a Grill Prep Table Be?
About 36 inches, the same as a kitchen counter. Here, 1-inch feet, 33 1/2-inch sides and a 1 1/2-inch top make 36.
How Far Should a Prep Table Be From the Grill?
At least 2 feet from the grill's sides and back, or farther if the grill's manual asks. A wooden table counts as something that can burn.
Can Pallet Wood Be Used Outside?
Yes, if it's stamped HT, sanded and sealed with exterior paint or stain. Keep it off the wet ground, and recoat it when water stops beading.
Can You Put Wheels on a Pallet BBQ Island?
Yes. Swap the leveling feet for four locking casters, and shorten the sides so the top still lands at 36 inches.
How Much Does a Pallet Grill Prep Table Cost?
About $135 to $170 at US stores, checked on October 15, 2026, with free pallets. The top and the finishes are most of it.


